Job Templates are generally generic types of jobs that are used as a base for quotes and orders. They can be setup with the most common or lowest base of specs and can be customized on the quote or order to fit the request. Job templates can make it possible for new users to learn how to create and quote simple jobs without the help of an estimator.
Adding a Press
Step Action
1. Select {Press} on the right-hand side of the screen to auto-scroll to
the Press section.
2. Select a Press type option from the first drop-down and then select a specific press
from the second drop-down.
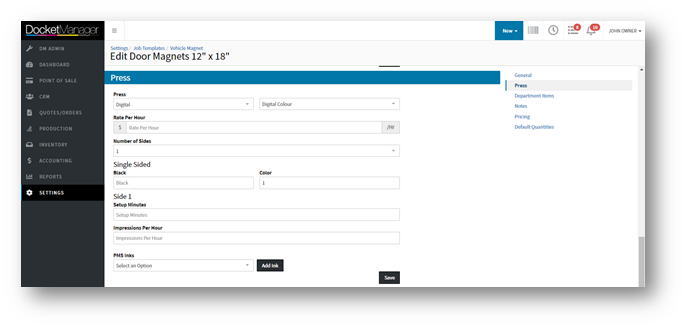
3. Complete the applicable fields. Note: Fields vary based on press type selection. Fields will calculate based on the selected presses settings by default but can be overridden.
Press
| Fields and Descriptions
|
Digital
| Rate Per Hour
| Enter the Rate Per Hour for the press.
| Number of Sides
| Select 1 or 2 from the drop-down menu.
| Single Sided
| Enter value in applicable field if the press is black or color.
| Double Sided
(Only appears if Number of Sides set to 2)
| Enter value in applicable field if the press is black, color, or mixed.
| Side 1/Side 2
(Side 2 fields only appears if Number of Sides set to 2)
| Setup Minutes - Enter value for setup time.
Impressions Per Hour - Enter value for impression per hour.
PMS Inks - Select a PMS Ink from the drop-down menu then select {Add}. A window will pop-up to confirm PMS Ink successfully saved.
|
|
Offset/Web/Perfector
| Workturn
| Enter value for Workturn, if applicable.
| Method
| Select Workturn or Work Tumble from the drop-down menu, if applicable.
| Ink Coverage
| Select Light, Heavy, or Average Ink Coverage from the drop-down menu.
| Rate Per Hour
| Enter the Rate Per Hour for the press.
| Number of Sides
| Select 1 or 2 from the drop-down menu.
| Double Sided
(Only appears if Number of Sides set to 2)
| Enter value in applicable field if the press is black, color, or mixed.
| Side 1/Side 2
(Side 2 fields only appears if Number of Sides set to 2)
| Passes - Enter value for number of passes.
Inks - Enter value for number of inks.
Plates - Enter value for number of plates.
Plate Price - Enter value for plate price.
Setup Minutes - Enter value for setup time.
Impressions Per Hour - Enter value for impression per hour.
Aqueous Coating - Select Yes or No from the drop-down.
PMS Inks - Select a PMS Ink from the drop-down menu then select {Add}. A window will pop-up to confirm PMS Ink successfully saved.
|
|
Wide Format
| Type
| Select Roll, Board, or Both from drop-down menu.
| Mode
| Select a Mode from the drop-down menu.
| Rate Per Hour
| Enter the Rate Per Hour for the press.
| Number of Sides
| Select 1 or 2 from the drop-down menu.
| Double Sided
(Only appears if Number of Sides set to 2)
| Enter value in applicable field if the press is black, color, or mixed.
| Side 1
| Price Per Hour - Enter value for price per hour.
Setup Minutes - Enter value for setup time.
Sqft Per Hour - Enter value for sqft per hour.
PMS Inks - Select a PMS Ink from the drop-down menu then select {Add}. A window will pop-up to confirm PMS Ink successfully saved.
| Side 2
(Only appears if Number of Sides set to 2)
| Setup Minutes - Enter value for setup time.
Sqft Per Hour - Enter value for sqft per hour.
PMS Inks - Select a PMS Ink from the drop-down menu then select {Add}. A window will pop-up to confirm PMS Ink successfully saved.
|
|
3. Select {Save}. A results window will pop-up to confirm the Template successfully saved.
Editing Press Details on Template Option
Step Action
1. Select {Press} on the right-hand side of the screen to auto-scroll to
the Press section.
2. Make required changes.
Note: PMS Inks can be removed by hovering mouse over color and then
selecting the X that appears. A window will pop-up to confirm PMS Ink
successfully removed.

3. Select {Save}. A pop-up will confirm the Template successfully saved.
 create new ticket
 check ticket status