 create new ticket
 check ticket status
The Forms feature allows you to create and publish custom web-based forms directly within your online ordering portal. Forms give your customers a structured, professional way to reach you — and give you clean, organized submissions delivered straight to your inbox.
When a customer submits a form, an email notification is sent automatically to you (the print shop owner). Optionally, a confirmation copy can also be sent to the customer who filled out the form — keeping them informed and reducing follow-up inquiries.
Create an Online Form
Online Ordering > Forms > {New}
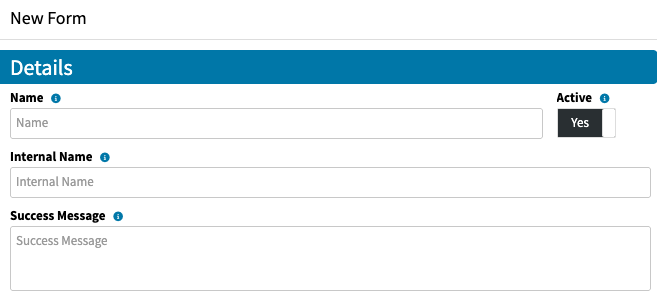
Details
Provide a Name for the Form that will appear online to the end user
Enter an Internal Name
Enter a Success Message that the end user will see when they submit the form

Emails
Toggle Send to Portal Admin Emails to Yes or No - if set to Yes an email will be sent to the admin of the Portal.
Enter an Admin Email Address if the toggle is set to No.
Toggle Email Requester if you would like the person submitting the form to receive an email copy. They will also be prompted to enter their email address into the form.

Fields
- Enter a value into the Label field to prompt an entry from the end user
- Fields can be set as Required using the Y/N Toggle
- Choose a Field Type
There are 7 Field Type Options:
- Single Line Text
- Multi Line Text
- Single Select
- Multi Select
- Dropdown
- Date Picker
- File Upload
Click on the + icon to add an additional Field
Click on the Trash icon to delete a Field
Publish an Online Form
Online Ordering > Forms
Create a Page
- Click on the 3 dot menu to the right of the Form that you would like to publish
- Click Copy Tag
- Navigate to Online Ordering Themes / Portals
- Click on the Portal that the Form should appear on
- Scroll down to Pages {New}
- Enter a Name for the Page
- Paste the Tag into the HTML window
- Click Save
Add Page to Navigation Menu
- Scroll down to Navigation
- Click New
- Enter a Name
- Choose Page from the Type dropdown
- From the Page dropdown choose the Page that was created in the steps above
- Click Save
Form Types & Use Cases
Below you will find some helpful examples of Online Forms, you are not limited to these options.
Quote Request Form
Use this form to capture all the details you need to generate an accurate estimate — without the back-and-forth.
Typical fields include: product type, quantity, size, paper stock, finishing options, turnaround time, and contact information.
Why it matters for you: Submissions arrive with structured, complete information, so your team can respond with an accurate quote faster and with fewer follow-up calls.
Why it matters for your customer: They can submit a detailed request at any time — no need to call during business hours or write a lengthy email and hope they included everything.
File Upload Form
Use this form to collect print-ready artwork or supporting files from customers as part of a job submission.
Typical fields include: job name or reference number, file upload field(s), file format notes, and any special instructions.
Why it matters for you: Files arrive alongside job details in a single submission, reducing the need to cross-reference separate emails. You can also set expectations upfront about accepted file types and specs.
Why it matters for your customer: They have a clear, dedicated place to submit files with confidence — no uncertainty about whether their email attachment made it through or went to spam.
Contact Us Form
Use this form as a general-purpose inquiry channel for customers who have questions, need direction, or aren't ready to place an order.
Typical fields include: name, email address, phone number, and message/inquiry.
Why it matters for you: Inquiries come in through a consistent channel with contact details already captured, making it easy to respond and log communication.
Why it matters for your customer: They get a simple, familiar way to reach you without needing to hunt for a phone number or email address — directly from the storefront they're already browsing.
Tips for Getting the Most Out of Forms
Keep forms focused — only ask for what you truly need at that stage of the workflow. A shorter form gets more completions.
Use the customer confirmation copy for Quote Request and File Upload forms so customers know their submission was received and have a reference they can follow up on.
For File Upload forms, include clear instructions within the form (accepted formats, max file size, color mode) to reduce prepress issues.
Consider publishing a Contact Us form even if you have other forms available — it acts as a catch-all for customers who aren't sure where to start.