 create new ticket
 check ticket status
Breadcrumbs
The top of the page displays the Menu Path - Online Ordering / Products / Product Parent Number each being a navigation link for ease of use.
Item Links
Links to the Products that are within the Parent Product Number in this example 10461, 10462, and 10465.
+ Icon
The + Icon allows you to create a new Product within this Parent Number using the following methods:
- Quick Add
- New From Template
- From Scratch
- Insert
Info Boxes
The quote item page presents info boxes containing different pieces of information specific to the item.

View / Edit Mode
Allows you to toggle between the two modes. If the option reads View Mode that indicates you are in Edit Mode and vice versa.
Save Icon
After making edits to the Product page click on the Save icon to save your work.
Actions Menu
The Actions menu includes the following items:
Summary - an onscreen overview of the selected item.
Create Job Template - allows you to take the selected item and repurpose it as a Job Template.
Duplicate - creates a copy of the item within the same parent number.
Sync - a blank action in DocketManager that is available in Zapier integrations.
Activity - tracks any changes made
Update Pricing - Clicking on the Save icon will update any Department Item or Press prices that have been updated in the background. By default Stock pricing will not auto update unless you click on Update Pricing in the Actions menu.
Hamburger Menu
The Hamburger Menu collapses the right hand side of the page and creates icons for Tasks, Item Files, Thumbnails, etc.
QUOTE ITEM PAGE
Each section of the page can be collapsed or displayed by clicking the arrow in the right corner.
Use the tool tip icons (i) to get more information on a specific field.
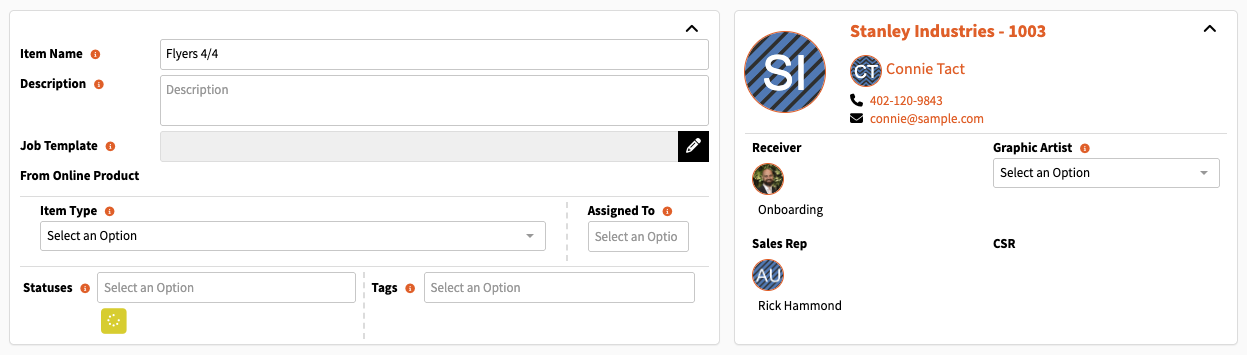
Item Name
The Name of the Product that transfers to the name of the Quote or Order Item. This field is also presented on the POS and Web2Print.
Item Description
The Name of the Product that transfers to the name of the Quote or Order Item. This field is also presented on the POS and Web2Print.
Job Template
A job template can be used to pre-fill specifications during setup but it is not necessary. Any changes made directly to the product will override anything that had pre-filled from a template. Once a template has been added to a product item, changes made to the template will not live-up date to the product. This is to ensure that pricing changes are not applied to a product that has already had custom pricing applied to it.
Learn more about - Job Templates
Item Type
Item Type is traditionally used at the Order level to indicate where the art files are located and what type of proof is needed. This is often the first line of communication between Customer Service and Prepress.
Learn more about - Item Types
Queue
If you would like this Product to skip the Default Workflow Queue when an order is placed you can set the Queue in this dropdown. This works well with fulfillment orders that can be placed in the Fulfillment or Shipping queue instead of To Assign.
Statuses
Any Statuses set in this field will be applied to any quote and order items that are created from the Product.
Learn more about - Statuses
Tags
Any Tags set in this field will be applied to any quote and order items that are created from the Product.
Learn more about - Tags
DATES PANEL

Due Dates
Dates can be manually entered into the provided fields
Order Due Option
The Order Due Option dropdown allows you to select a predetermined Order Due Option
Learn more about - Order Due Options
Time Sensitive
Toggling this setting to Yes opens up time option selections
Firm Date
Locks down the Item Due Date field
PRICING PANEL
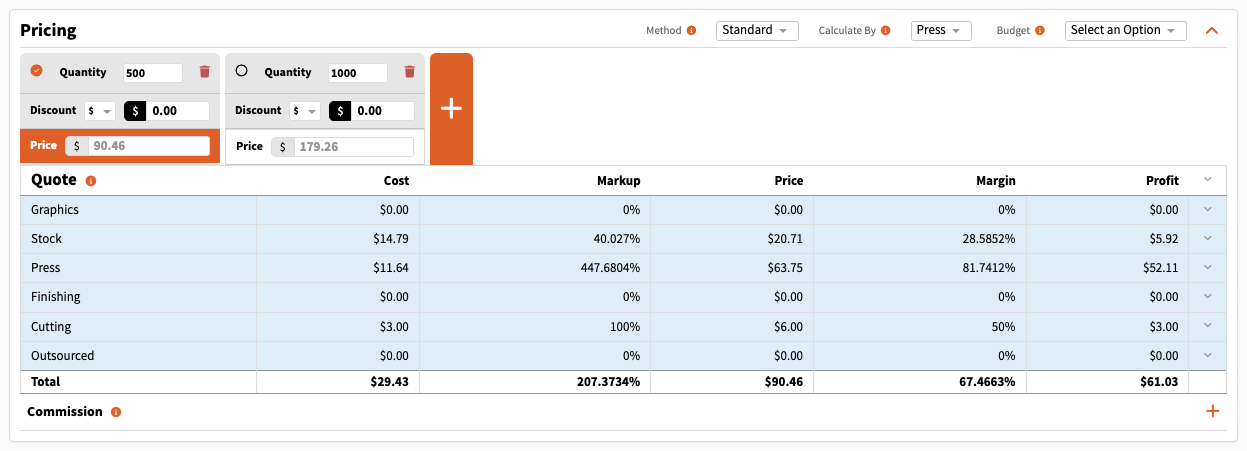
Method
Standard Pricing
Freeform system calculated pricing - Quantity x Sets x Version x Sheets
Price Per Version
Pricing is calculated for one finished piece (Quantity x Sheets x Sets) and is then multiplied by the number of versions.
Multi Version Markup
Standard Pricing with a markup on top based on the number of versions.
Calculate By
Template Option
Pricing is set at the Template level
Press
Freeform system calculated pricing based on Stocks, Department Items, Presses, and Outsourcing.
Product
Product Pricing is an override on Press Pricing that allows you to set custom prices for specific products at certain quantities. See Product Pricing below for more information.
Budget
A Budget can be assigned to an item by choosing the corresponding budget from the dropdown.
Learn more about - Budgets
Quantity
These are the default quantities that will pull into a quote or order item when the Product is used for manual entry. For Online and POS these are the quantities that will be available if the Quantity Selection (see above) is set to Drop Down.
The checkbox to the left of the Quantity is the Selected Quantity to switch to another option click the radio button and click save.
+ icon
Allows you to add another quantity.
Price
This field can be overridden but it is highly advised that you utilize Product Pricing to override prices.
Orange Arrow
To the right of the pricing table in the top corner there is a purple arrow that will expand the entire table. This will display fields across the top that can be used to set a global Cost, Markup, and Price.
Grey Arrows
These icons allow you to expand a specific section of the pricing table.
Commission
To add a Commissionable User to this Product, click the + icon on the right and choose the Employee, Type, and Amount.
GRAPHICS PANEL

File Name
Use this field to indicate the name of the file that you are working or going to work on that coincides with this product.
Estimated Time
This field is usually utilized once the product has been used to create a quote or order item.
Bill Estimated Graphic Time
Select if you wish to Bill for the Estimated Amount of Graphic Time. Y/N
Graphic Discount
Set a Graphic Discount for this product if necessary.
Graphic Rates
Choose the Rate that the Graphic Timer will run against.
Learn more about - Timers
Department Items
These are the Graphic Department Items that are part of the item.
STOCK PANEL
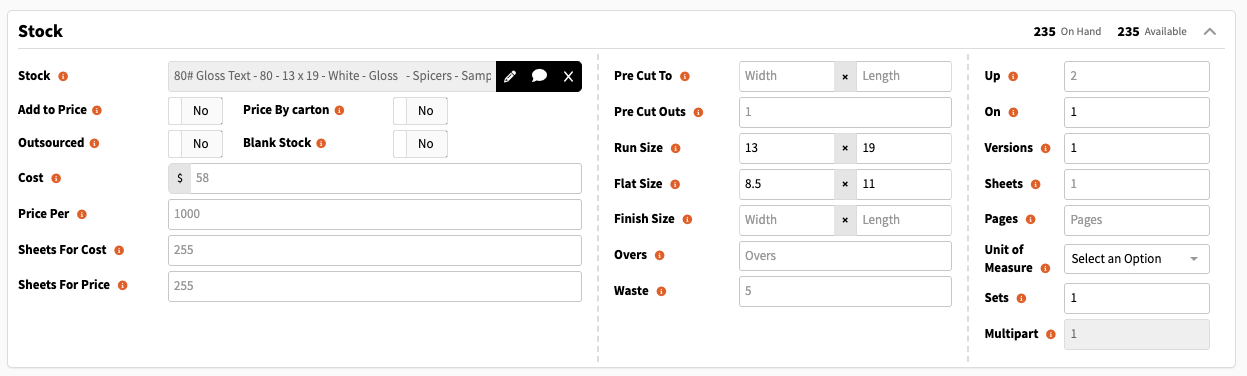
Stock
To change the Stock click on the edit pencil icon.
To indicate a Custom Stock click on the speech bubble.
To Delete the stock from the item click on the X.
Add to Price
This toggle is specific to Product Pricing. If you want to charge for the Stock on top of the Product Price toggle to Yes if not set as No. If you are using Press Pricing this toggle can be set to Yes or No.
Price By Carton
This setting is usually preset at the Stock level and will charge in increments based on the Package Quantity field.
Outsourced
Set to No unless the stock is being supplied to you by your Customer or an Outsourced Vendor.
Blank Stock
If set to Yes the Blank Markup Scales will be used in place of the Printed Markup Scales at the Stock level.
Cost
An auto-calculated field based showing the Cost of the stock based on the specifications of the item.
Price Per
The amount of sheets that the Cost is based on.
Sheets For Cost
How many sheets are needed for the Cost column of the Pricing table. This field can be adjusted at the Order level if more sheets were run due to errors or make ready.
Sheets For Price
How many sheets are needed for the Price column of the Pricing table.
Pre Cut To
This field is not required but can serve as a visual indicator displaying the size tha the Parent Sheets need to be cut to prior to running the job.
Pre Cut Outs
This is the number of press sheets that can be created from a parent sheet.
Run Size
The size of the sheet that will travel through the press.
Flat Size
The Flat Size of the piece prior to and post press processes. Flat Size works directly with Run Size to create an imposition.
Finish Size
The size of the piece after post press processes such as folding. This is an informational field that can be used by prepress and bindery to make sure the finished piece is the correct size.
Overs
This is the number of finished pieces needed in addition to the order quantity.
Waste
This is an auto calculated field that pulls values from Press and Department Item settings.
Up
The number of Flat Size pieces that fit on the Run Size.
On
The number of unique images on a Run Size sheet. This field is only needed when there are more than one Version or Sheets.
Versions
This is the number of different pieces of artwork with the same specs. Example 2 Names of Business Cards = 2 Versions.
Sheets
This is the number of physical sheets required to make one finished item. Do not confuse this field with Press Sheets which is auto calculated in the Press Section.
Pages
An informational field that is not calculation based. Use this field when you are creating a book to indicate how many pages there are.
Unit of Measure
This drop down allows you to apply a label to the Sets field below.
Sets
This is the number of times artwork repeats itself in one item. Example pads of 50 would require 50 Sets and the Quantity field would be the number of pads of 50 being ordered.
Multipart
The number of parts the stock is comprised of. Example 2part NCR = Multipart 2.
PRESS PANEL
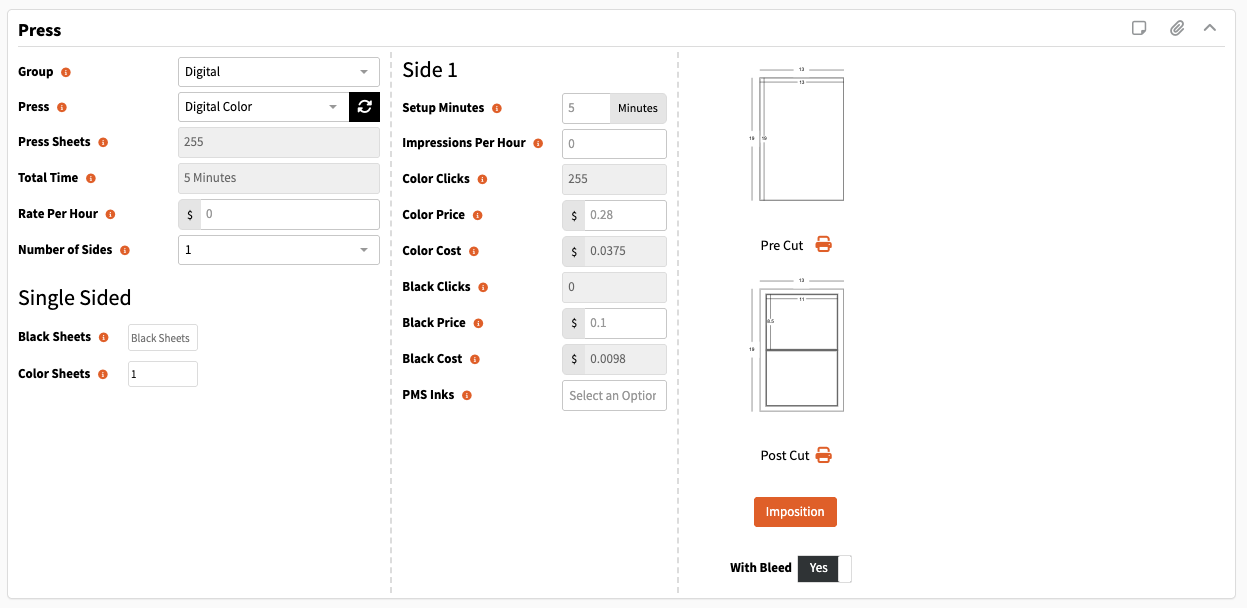
Group
The Group dropdown filters the results for the Press dropdown.
Press
You can change the Press in the dropdown or refresh the press settings by using the icon to the right.
Press Sheets
In Digital and Offset this is the number of Run Size Sheets needed. In Wide Format this value is specific to the Square Feet needed.
Total Time
The total amount of time needed to setup and run the job.
Rate Per Hour
The Rate Per Hour is set at the Press level and can be scaled if necessary.
Learn more about - Presses
Number of Sides
FINISHING PANEL

Pre Cuts
The number of cuts needed to cut the Parent Sheet size down to the Run Size.
Pre Cuts Price
This value is set at the Stock level in the Cut Price field.
Post Cuts
The number of cuts needed to cut the Run Size down to the Flat Size.
Post Cuts Price
This value is set at the Stock level in the Cut Price field.
Numbering
If an item requires numbering you can set the Prefix value, Color, and Range. Reorders will automatically pull the next sequence of numbers based on the quantity of the order item.
OUTSOURCED PANEL

Vendor Name
This is the Company that will be performing the Outsourced work for you.
Learn more about - Vendors
Vendor Contact Name
This is not a required field but if you plan on emailing the Outsourced PO this is where the email address will pull from.
Quote Number
If the Vendor provided you with a Quote Number you can log it here. By default the Quote Number will appear on the Outsourced PO document for your Vendor.
PO Number
By default the Order Item Number is set as the PO Number on your Outsourced PO documents. This field can be left blank.
Docket Number
An additional field that can be used internally or displayed on the Outsourced PO document.
Type
Outsourced Types allow you to track how much work was outsourced by Type. Each type is assigned a GL Account for revenue tracking.
Learn more about - Outsourced Types
Scale Selection Type
Step is a hard stop between quantities and prices.
Average creates a curve between quantities and prices.
Chosen
If you are getting multiple quotes from different Vendors you can add a line for each one and then mark the preferred option as Chosen. The other options will be stored in the Outsourced section in case the preferred Vendor cannot get the job done in time. If you are only getting one outsourced quote it is still necessary ot mark that Vendor as Chosen. This selection can be defaulted to Yes in Settings > Dockets > General > Item Defaults > Outsourced Chosen.
Description
A Description of the work to be performed by the Vendor should be entered into this field. This field is not Customer facing.
Pricing
To add a Cost scale click the + icon to the right. The quantity should match the quantity in the pricing table and the cost should be the total cost specific to that quantity. You can enter a Markup or a Price and the system will auto calculate the other field.
RIGHT HAND NAVIGATION
Tasks
Tasks are a great replacement for inner-office email, post it notes, and shouting across the pressroom
Learn more about - Tasks
Item Files
To add an item file to your quote, click on the + sign to the right. You will be prompted with options to select a Type File or URL and then a File Group.
Thumbnails
Thumbnails are automatically generated based on file group settings.
Learn more about - File Groups
Preview Files
When a file is uploaded using the Preview - File Group the file will appear in the Preview section.
Notes
Any Notes that are added to an item will carry over to the quote / order item level. Item Notes can be specific to a Department which can display on Production Queues and Documents or Generic which by default does not display anywhere else in the system.
Learn more about - Notes
Department Items
The graphic and bindery charges on an item are driven by Department Items.
Learn more about - Department Items